User authentication & authorization
This page will guide you through use of API operations that need user authorization
Overview
Some operations from our API need to access private user data. You need the users' authorization in order to read or write over it on their behalf. We provide a method to interact with InfoJobs users' private data without them having to share their credentials with you. In fact for security reasons your application must never ask your users to enter their InfoJobs credentials. In the documentation of each API operation you will see which operations need user authorization and what kind of permissions (from now on called scopes) the authorization grants access to. InfoJobs uses OAuth 2.0 for authentication and authorization. You can read more about this protocol in the official OAuth 2.0 site.
A successful authentication process results in the obtention of an OAuth2 access token that may be used to make requests to the methods from our API that require InfoJobs user authorization.
OAuth 2.0 authentication flow
Below we present a flow diagram that illustrates the different steps you have to follow in order to successfully complete the authentication flow. We will then provide more details on how your application should behave for each step marked with a number in the diagram.
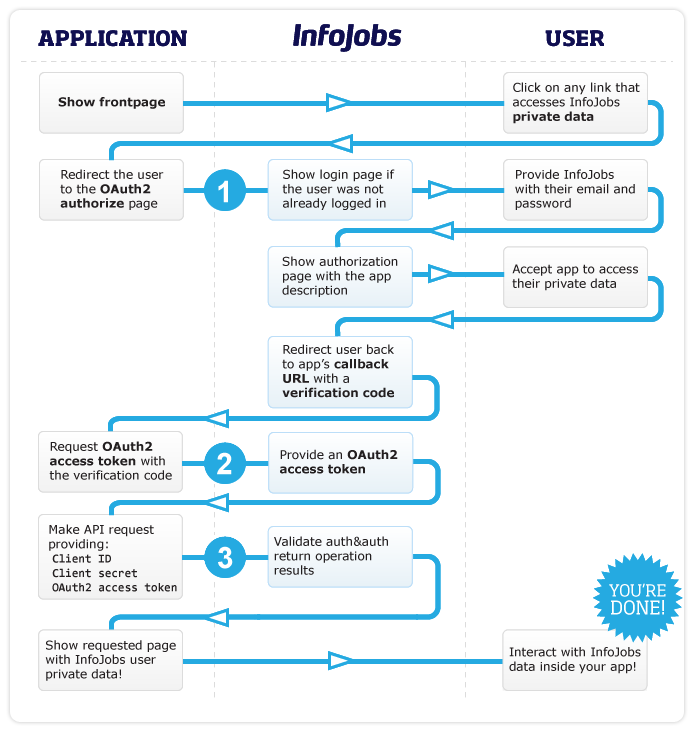
Figure 1. InfoJobs OAuth2 authentication flow
-
Redirect the user to the OAuth2 authorize page
Once a user is willing to use a functionality in your application that makes a call to InfoJobs API that needs user authorization, you need to redirect the user to the InfoJobs OAuth2 authorization page specifying all the scopes your application will use(You can see the necessary scope for each operation in its documentation). You have to build up a URL like:
	https://www.infojobs.net/api/oauth/user-authorize/index.xhtml
	?scope=COMMA_SEPARATED_LIST_OF_SCOPE_NAMES
	&client_id=YOUR_CLIENT_ID
	&redirect_uri=YOUR_CALLBACK_URI
	&response_type=code
	&state=OPTIONAL_CLIENT_LOCAL_STATE
Then just send the users to this URL. If the users did not have an open session at InfoJobs, a login page will be shown for them to enter the email and password used to access their InfoJobs account. If the users already had an open session with InfoJobs then this screen will not appear.
 Figure 2. InfoJobs login screen
At this point a session is open, if they have not already authorized your application, an authorization screen will be presented requesting user approval to authorize your application to access the different specified scopes.
 Figure 3. InfoJobs application authorization screen
Once the users have given their consent, an Oauth2 verification code will be generated by InfoJobs and sent to your application as a parameter of the Callback URI you specified when registering your application (Notice that if you have a desktop or mobile application you might use the Infojobs standard redirect_uri for this kind of applications: http). Something like:
http://yourdomain.com/ij-api-callback-uri.php?code=6bb2bca0-745a-11e1-b0c4-0800200c9a66
The value of the code parameter is the verification code you have to use in step 2.
Note that if your application cannot receive incoming request you may use the InfoJobs redirect_uri for desktop and mobile applications. http://www.infojobs.net/core/oauth2vc/index.xhtml. This page will show the verification code in the form so the client application can retrieve it.
-
Request OAuth2 access token with the verification code
Once you have the verification code, your application has to make a request to exchange it for an OAuth2 access token. To do so you only have to make a POST to the following URL:
https://www.infojobs.net/oauth/authorize
Using the following parameters:
	grant_type=authorization_code
	client_id=YOUR_CLIENT_ID
	client_secret=YOUR_CLIENT_SECRET (URL Encoded if necessary)
	code=VERIFICATION_CODE_AQUIRED_IN_STEP_1
	redirect_uri=YOUR_REDIRECT_URI
Note that the client_secret parameter may contain some special characters that might need to be URL encoded. The next form will help you to URL encode the client_secret
Once you do the previous POST request to https://www.infojobs.net/oauth/authorize, the server will return you an access token along with a refesh token and an expiration time in a JSON format as shown below:
{
	"access_token": "07d18fac-77ea-461f-9bfe-a5e9d98deb3d",
	"expires_in": 43199,
	"refresh_token": "49831c3d-859c-4b78-aa67-12168f469129",
	"scope": "MY_APPLICATIONS",
	"token_type": "undefined"
}
Refresh access token
When access token expires, you can get another valid access token using refresh token. To do this, you have to perform a POST request to the same URL with the following parameters:
	grant_type=refresh_token
	client_id=YOUR_CLIENT_ID
	client_secret=YOUR_CLIENT_SECRET (URL Encoded if necessary)
	refresh_token=REFRESH_TOKEN_AQUIRED_IN_STEP_2
	redirect_uri=YOUR_REDIRECT_URI
-
Make API requests
You're ready to start using our private API.
In order to make a request to a private service, you need to add the Bearer access token to the client basic Authentication header separated by a comma. The token is in plain text and doesn't need to be encoded.
Here is an example of headers containing the client basic authentication along with the Bearer access token:
	GET /api/1/application HTTP/1.1
	Host: api.infojobs.net
	Authorization: Basic QWxhZGRpbjpvcGVuIHNlc2FtZQ==,Bearer 07d18fac-77ea-461f-9bfe-a5e9d98deb3d
	....
You can find all our API operations listed in our operations list. There you'll find documentation for each operation. The documentation contains a description of the service, the in and out data, sample requests and responses, service URI, required scope, user role and error codes associated to the service.
 Figure 2. InfoJobs login screen
 Figure 3. InfoJobs application authorization screen